Dual Tilemap Autotiling Technique

Intro
Autotiling is one of those topics every 2D gamedev bumps into sooner or later.
You want maps that look nice without hand-placing every edge and corner, but you don’t want to manage a monster tileset with 50+
variants just to blend one terrain type into another.
In this post, I’ll show you the dual Tilemap technique I use in ExcaliburJS with TypeScript.
This method cuts the needed art down to just 5 tiles, keeps your code simple, and separates gameplay logic from visual decoration.
Quick Review of Autotiling
Autotiling is about automating which tile sprite to draw based on a tile’s neighbors.
Instead of painting every edge by hand, the engine checks surrounding cells and picks the right graphic.
The most common approaches:
- Blob / bitmask – looks at 8 neighbors; needs ~47–56 tiles.
- Marching Squares – 4-bit mask (N/E/S/W); needs 16 tiles.
- Wang tiles – edges/corners encode transitions; flexible, but still asset-heavy.
These work well but tend to require large tilesets and entangled rules.
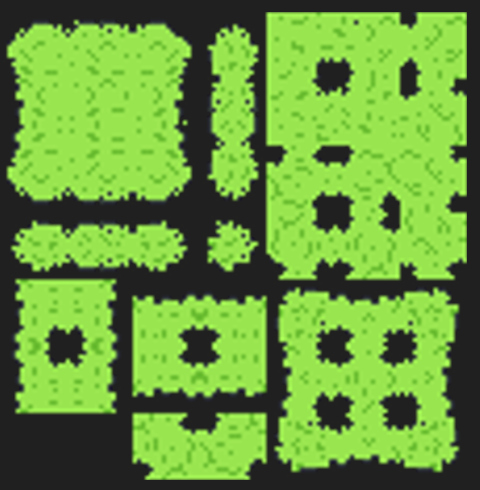
My last dive into autotiling, Autotiling Technique, implemented a 47 tile tileset and bitmasking. While it worked and looked great, the algorithm forced me to do a lot of work mapping all the different bitmasks to the 47 tiles. It took a lot of manual effort.
Example from my last autotiling project:

Traditional Autotiling Techniques
The classic techniques all share a common trade-off: flexibility vs. asset count.
-
Blob / Bitmask (47+ tiles)
Each neighbor contributes to a binary mask (8 bits → 256 possibilities).
Many cases overlap visually, so artists usually trim down to ~47 unique tiles.
This means dozens of sprites to draw and maintain. -
Marching Squares (16 tiles)
Simpler 4-bit system that only considers N/E/S/W.
It’s easier to code, but you still need 16 distinct tiles. -
Wang Tiles
Encode transitions on edges or corners. Very elegant mathematically, but each terrain type still multiplies your tile count.
These all work — but if you only want a clean outline between Ground
and Void
, they’re overkill.
What is the problem?
A ton of art
When I implemented a 47-tile bitmask system, the art looked great — but the cost was high:
- Artist time: drawing 47 tiles for every new biome or terrain type.
- Mapping complexity: bitmask → tile index lookups are tedious and brittle.
- Coupling: logic and visuals are glued together; small rule changes break the whole set.
This complexity grows fast when you add multiple terrain types (grass, sand, snow, etc.).
The Ambiguous Tile
Visual: Part of the tile shows one terrain (e.g., grass), while the rest shows another (e.g., soil/ground).
Gameplay/Logic: The walkable area is determined by the world Tilemap (logic map), not the graphic overlay. So even if half the tile visually looks like grass, the character might still be able to walk over it if the underlying tile is marked as walkable ground.This leads to a detail that the game developer must manage: is the tile walkable or usable?

Benefits of a dual Tilemap solution
Instead of one giant Tilemap that does everything, we split the work:
-
World Tilemap (logic)
Just 2 states and one tile: thebackground
tile. This is the world Tilemap and is used for game logic. For this demonstration we are manage the states ofsoil
orgrass
. -
Graphics Tilemap (overlay)
Only 5 tiles:Edge
,InnerCorner
,OuterCorner
,Filled
, orOpposite Corners
These can be rotated and stacked to create all the shapes we need.
Total: 6 tiles, the background tile plus 5 different grass tiles.
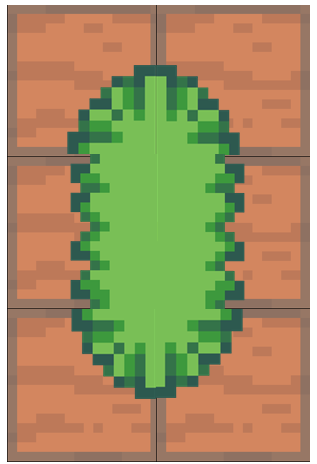
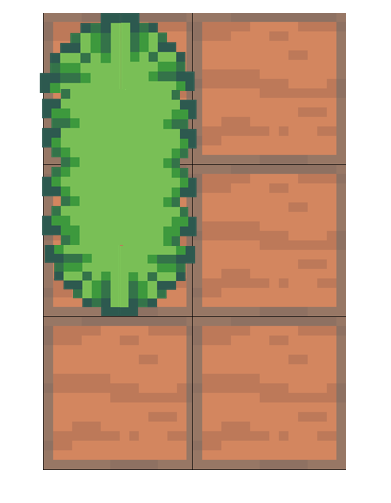
Removal of the ambiguous tile
With the offset 2nd Tilemap, we can better align the mesh textures to the actual world tiles, removing the ambiguous tile problem stated earlier.

Why this is powerful
- Tiny tileset (easy for artists).
- Composable overlays (T-junctions, crosses, islands all “just work”).
- Separation of concerns (logic map stays clean).
- No Ambiguous Tiles
A walk through the algorithm
For my demonstration, I created two Excalibur (Ex) Tilemaps. One I called worldMap
and the other meshMap
.
Getting started and setup
ts
const worldMap = new TileMap({columns: 10,rows: 10,tileWidth: 16,tileHeight: 16,});// Note: the meshMap needs to 'overlap' the world map by one tile, you'll see what laterconst meshMap = new TileMap({columns: 11,rows: 11,tileWidth: 16,tileHeight: 16,});// Position the TilemapsworldMap.pos = vec(0, 0);worldMap.z = 0;// Note: the mesh Tilemap's position is half a tile offset; this is importantmeshMap.pos = vec(-8, -8);meshMap.z = 1;// Load Assets and add Tilemaps to gameawait game.start(loader);game.add(worldMap);game.add(meshMap);//move camera and center on the Tilemapgame.currentScene.camera.pos = vec(16 * 5, 16 * 5);game.currentScene.camera.zoom = 1.25;
Assets
The tileset i'm using has 6 tiles, the first is the 'base' soil tile that covers the world Tilemap. The next 5 are the 5 tiles needed for this autotiling technique. For the purposes of this demonstration I included a light border around the soil tile so the end result can more readily show how the Tilemaps line up.
Initializing Tile State
I loop through all the tiles initially to setup the intial state for each Tilemap.
ts
// Instead of using a TypeScript enum, I like to define my tile states as a const object with string literal valuesconst TileState = {soil: "soil",grass: "grass",} as const;// Setup the world map statefor (const tile of worldMap.tiles) {tile.addGraphic(tileSS.getSprite(0, 0)); // This sets the default 'soil' tile from the spritesheettile.data.set("state", TileState.soil); // This is setting the data store of each tile to 'soil'}// Setup the Mesh map statefor (const tile of meshMap.tiles) {tile.data.set("worldNeighbors", getWorldNeighbors(tile)); // Each tile in the meshMap needs to know its corresponding 'worldMap' neighbors, 4 for each tile (TL, TR, BL, BR)tile.data.set("meshTile", null); // which index of the spritesheet do I accesstile.data.set("rotation", 0); // how do I rotate the graphic}
Storing the neighbor data
ts
type TileList = {TL: Tile | undefined;TR: Tile | undefined;BL: Tile | undefined;BR: Tile | undefined;};const getWorldNeighbors = (currentMeshTile: Tile): TileList => {let TL: Tile | undefined = undefined;let TR: Tile | undefined = undefined;let BL: Tile | undefined = undefined;let BR: Tile | undefined = undefined;// get vectors of four cornersconst topLefMeshTile = currentMeshTile.pos.clone();const topRightMeshTile = currentMeshTile.pos.clone().add(vec(16, 0));const bottomLeftMeshTile = currentMeshTile.pos.clone().add(vec(0, 16));const bottomRightMeshTile = currentMeshTile.pos.clone().add(vec(16, 16));// for each corner, find mesh tile that contains that positionTL = worldMap.tiles.find(tile => topLefMeshTile.equals(tile.center));TR = worldMap.tiles.find(tile => topRightMeshTile.equals(tile.center));BL = worldMap.tiles.find(tile => bottomLeftMeshTile.equals(tile.center));BR = worldMap.tiles.find(tile => bottomRightMeshTile.equals(tile.center));return { TL, TR, BL, BR };};
It is important to understand how I approached storing the tile map data. My disclaimer: there is more than one right way to do this, and I'm certain there are more optimum means. This is simply my approach.
Not every tile will have 4 neighbors, if you consider the edge of the worldMap, there may only be one or two neighbors available which is why I allow undefined values for the tile positions as well. The majority of the tiles can/will be surrounded by 4 world tiles. The fact that the mesh Tilemap is offset by half of the tilesize, means that the corners of the mesh tile land on the centers of the four neighbors, and I use this to my advantage.
Managing the mouse input
While not specific to Tilemapping, controlling the mouse properly to set the worldMap tile states is important. When I click and drag the mouse, what I'm doing is using the mouse pointer positions to set/clear the world tile state. I use the Left Mouse Button (LMB) to set 'grass' state, and use the Right Mouse Button to clear the 'grass' state to 'soil'.
ts
let isDragging = false;let lastTile: Tile | null = null;let activeButton: PointerButton | null = null;game.input.pointers.primary.on("down", e => {if (e.button !== PointerButton.Left && e.button !== PointerButton.Right) return; // ignore other buttonsactiveButton = e.button;isDragging = true;lastTile = null; // reset so first tile definitely triggerssetTileState(game.input.pointers.primary.lastWorldPos, activeButton);});game.input.pointers.primary.on("up", e => {isDragging = false;lastTile = null;activeButton = null;});game.input.pointers.primary.on("move", e => {if (isDragging && activeButton) {setTileState(game.input.pointers.primary.lastWorldPos, activeButton); // <---- this manages the click and drag 'drawing' of tiles}});
Changing Tile State
ts
const setTileState = (pPos: Vector, buttonState: PointerButton) => {// get tile coordsconst tx = Math.floor(pPos.x / worldMap.tileWidth);const ty = Math.floor(pPos.y / worldMap.tileHeight);// if tile coords are 'inside' the worldmapif (tx >= 0 && tx < worldMap.columns && ty >= 0 && ty < worldMap.rows) {// if we moved to a new tileif (lastTile !== worldMap.getTile(tx, ty)) {const state = buttonState === PointerButton.Left ? TileState.grass : TileState.soil;worldMap.getTile(tx, ty)!.data.set("state", state);lastTile = worldMap.getTile(tx, ty);}}//update the mesh data and redrawupdateMeshMap();redrawMeshTileMap();};
As the mouse moves with the LMB or RMB held down, the setTileState method is being called with the position and button state details. This method uses this data to set the worldMap tile states appropriately. Then redraws the Tilemap.
The Magic, selecting which tile and how to rotate
For this section, this is where one had to sit down and consider how each tile is drawn. This is my approach;
- Loop over world neighbors and 'count' grass tiles
- For each 'combination' of grass tiles, select the tile index
- For the couple of tiles where rotation is important, figure out 'where' the grass tiles are located
Let us walk through the code:
ts
const updateMeshMap = () => {for (const tile of meshMap.tiles) {// get the predetermined neighbor referencesconst worldNeighbors = tile.data.get("worldNeighbors");const { spriteIndex, rotation } = calculateMeshSprite(worldNeighbors); // call the function that returns the index and rotation structure// if no tile data needed, clear out the mesh dataif (spriteIndex === null || rotation === null) {tile.data.delete("meshTile");tile.data.delete("rotation");continue;}// set the mesh data appropriatelytile.data.set("meshTile", spriteIndex);tile.data.set("rotation", toRadians(rotation)); // this is where the rotation is converted to Radians for proper graphic rotation}};
This is a straightforward utility method that loops through each tile and sets the data appropriately, there's still one more magical method to dive into.
ts
const calculateMeshSprite = (neighbors: TileList): { spriteIndex: number | null; rotation: number | null } => {// 1. Count the grass tileslet grassCount = 0;Object.values(neighbors).forEach(tile => {if (!tile) return;if (tile.data.get("state") === TileState.grass) {grassCount++;}});// based on grasstile count, make a decisionlet spriteIndex = 0;let rotation = 0;let isTLGrass = neighbors.TL?.data.get("state") === TileState.grass;let isTRGrass = neighbors.TR?.data.get("state") === TileState.grass;let isBLGrass = neighbors.BL?.data.get("state") === TileState.grass;let isBRGrass = neighbors.BR?.data.get("state") === TileState.grass;...
So far in this function we've looped through the neighbors object and counted the grass tiles. Also, I've setup some helper flags for assisting with orientation.
ts
...// No grass, return the nullish stateif (grassCount === 0) return { spriteIndex: null, rotation: null };// one grass square, use the sprite with just a corner piece, index 1else if (grassCount === 1) {spriteIndex = 1;//rotate the tile based on which of the corners is grassif (isTLGrass) {rotation = 180;} else if (isTRGrass) {rotation = -90;} else if (isBLGrass) {rotation = 90;} else if (isBRGrass) {rotation = 0;}}...
The grassCount: 0 scenario is super simple, return nulls so that nothing is drawn. But let us look into the grassCount:1 quick to get an ideas of what we are working with.

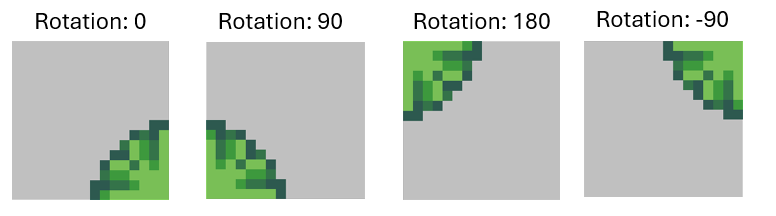
We can use the utility flags for us to set the appropriate rotations, and you can see this pattern show up in the next two scenarios as well. I won't draw the permutations but the commens walk you through each situation.
Below both 2 grass tile and 3 grass tile scenarios. The 3 grass tile scenario it just seemed easier to me to track which tile was not a grass tile.
ts
...// two of the neighbors are grass, that could be two different tile indexes possiblyelse if (grassCount === 2) {// are they next to each other or cattycorner?// first four are when they are next to each otherif (isTLGrass && isTRGrass) {spriteIndex = 2;rotation = -90;} else if (isTLGrass && isBLGrass) {spriteIndex = 2;rotation = 180;} else if (isTRGrass && isBRGrass) {spriteIndex = 2;rotation = 0;} else if (isBLGrass && isBRGrass) {spriteIndex = 2;rotation = 90;}// next two are the 2 catty corner conditionselse if (isTLGrass && isBRGrass) {spriteIndex = 3;rotation = 90;} else if (isTRGrass && isBLGrass) {spriteIndex = 3;rotation = 0;}}// three grass, one soil, let's track the soil tile, its just easierelse if (grassCount === 3) {spriteIndex = 4;// to note, we're specifically looking for the tile that's NOT grassif (!isTLGrass) {rotation = 0;} else if (!isTRGrass) {rotation = 90;} else if (!isBLGrass) {rotation = -90;} else if (!isBRGrass) {rotation = 180;}}// all grass tiles, rotation is irrelevantelse if (grassCount === 4) spriteIndex = 5;return { spriteIndex, rotation };};
Final section, drawing
ts
const redrawMeshTileMap = () => {let tileindex = 0;for (const tile of meshMap.tiles) {// clear current tile graphicstile.clearGraphics();//grab sprite index and rotationconst spriteIndex = tile.data.get("meshTile");const rotation = tile.data.get("rotation");tileindex++;// no sprite data, move on to next tileif (!spriteIndex) continue;// if there is tile data, grab appropriate sprite, and rotate itlet sprite = tileSS.getSprite(spriteIndex, 0);let spritecopy = sprite.clone(); // <------ if you don't create a copy of the sprite, you'll end up rotating ALL of them in the Tilemapspritecopy.rotation = rotation;tile.addGraphic(spritecopy); // draw the graphic}};
The final thing left to do is simply managing the 'drawing' of the graphics to each tile location. We do this by looping through the mesh tiles, and if there is data present, redraw it to the tile.
The Demo
I place a small and quick demo application out on Itch.io. This demo can give you the sense of how smoothly this works, it is almost magical!
Link to demo: Link
Link to Source: link
Why Excalibur

Small Plug...
ExcaliburJS is a friendly, TypeScript 2D game engine that can produce games for the web. It is free and open source (FOSS), well documented, and has a growing, healthy community of gamedevs working with it and supporting each other. There is a great discord channel for it JOIN HERE, for questions and inquiries. Check it out!!!
Summary
Autotiling is one of those problems that looks simple but can quickly balloon into complexity — traditional methods often demand dozens of tiles and intricate bitmask rules.
By splitting responsibilities between two Tilemaps, we drastically simplify the workflow:
- World map handles logic with just 2 states (
soil
,grass
) and a base tile graphic. - Graphics map overlays visuals with only 5 tiles.
- Total: 5 tiles instead of 47+.
The dual Tilemap method keeps your code clean, your art requirements minimal, and your system flexible for new biomes or mechanics.
If you want to dig into the details, check out the demo on Itch.io and the
source on GitHub.
It’s a simple idea that pays off big when your worlds start to grow.
For more information
This information was learned via a few YouTube videos, which I recommend if you want to dive deeper.